Veggie Staples

dairy free, gluten free, refined sugar free, plant based recipes

  • Home
  • About
  • Recipe Index
    • Appetizers & Sides
    • Breakfast
    • Desserts & Baked Goods
    • Entrees
    • Smoothies & Drinks
  • Health & Wellness
    • Health & Wellness
    • Book Reviews
    • Weight Loss
    • Workouts

The Best Gluten Free ‘Sugar’ Cookies

August 22, 2020 · by Meg · 1 Comment

The Best Gluten Free ‘Sugar’ Cookies

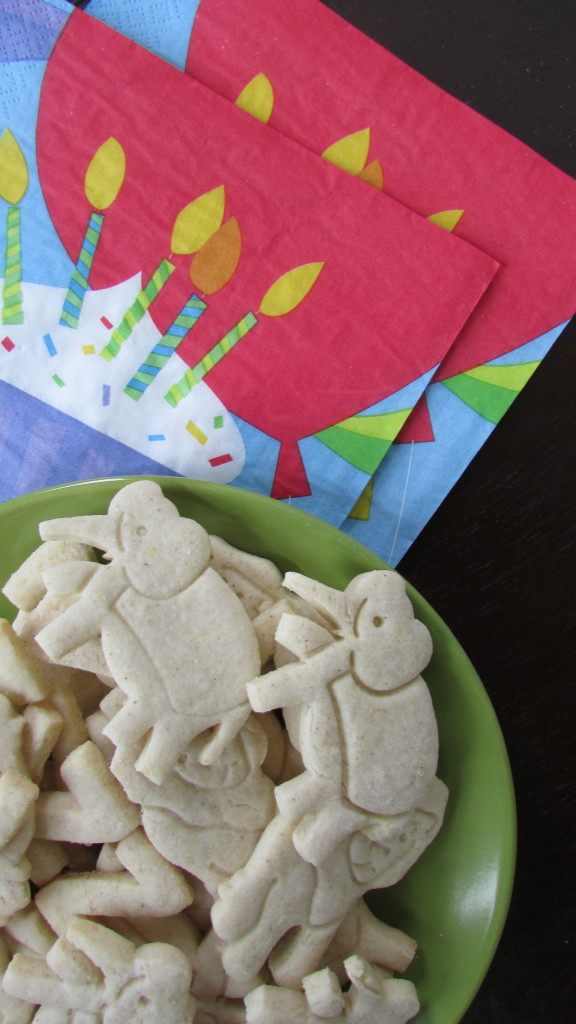
We recently celebrated Zoey’s first birthday - I’m not really quite sure where 1 year went! Here she is shoving her face full of birthday cupcakes at school (gluten free & dairy free, of course)!!

zoeybirthday3

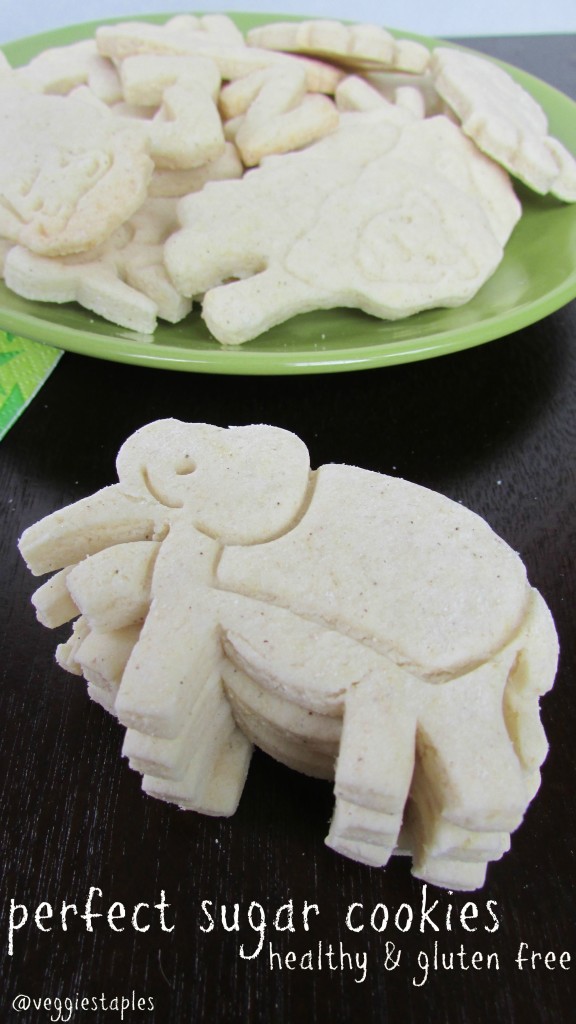
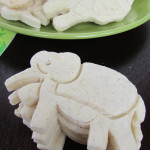
One thing I also sent to school with Zoey were these awesome ‘sugar’ cookies - they really are the best gluten free ’sugar’ cookies!!!! The kids really loved them and I don’t mind giving Zoey a treat knowing it’s gluten free and as ‘healthy’ as it can possibly be, not full of anything processed. Sometimes I think I’m crazy when I make everything homemade (time consuming), but at least I know what’s in them and what she’s eating - plus these really are the best gluten free ‘sugar’ cookies.

IMG_3342

You would never know I’ve replaced everything bad that comes in a normal sugar cookie and replaced it with much better ingredients! I also love making sugar cookies because I love all the fun cookie cutters you can use to make them way more fun - my Mom bought me a bag of 100 different cookie cutters last year for Christmas, and I don’t think I will ever have a shortage of any cookie cutter I’m looking for!

Print
The Best Gluten Free ‘Sugar' Cookies
Author: Meg Staples
Recipe type: Cookie
Prep time:  1 hour
Cook time:  8 mins
Total time:  1 hour 8 mins
Serves: 38-48 cookies
 
Ingredients
  • 1.5 cups Gluten Free Enjoy Life All Purpose Flour
  • ½ cup coconut oil, melted
  • ¼ cup coconut sugar
  • 1 egg
  • 1 tbsp vanilla extract
  • 1 tsp baking powder
Instructions
  1. Mix coconut oil & coconut sugar together
  2. *beating in a mixer will make it much easier, but not necessary
  3. Add the egg, vanilla extract, and beat until blended
  4. Add the flour and baking powder until completely combined.
  5. Remove from the bowl and roll into a ball.
  6. Place the ball of dough on a plate or in a ball (covered by plastic wrap or a dish towel) for 30-45 minutes.
  7. Preheat the oven to 350 degrees
  8. Remove dough from refrigerator and use extra gluten free all purpose flour to sprinkle on your countertop (I like putting some on my rolling pin too).
  9. Roll the dough out to the desired thickness (around ¼ inch seems to work the best)
  10. * I did mine in small sections, I just found this easier
  11. Cut the dough with your cutters and place onto your silpat or greased baking sheet
  12. *you’ll get 38-48 cookies depending on how big your cookie cutters are
  13. Bake for 8-10 minutes until the cookies are faintly golden brown on the edges.
  14. Allow to cool before eating! (I like this wire rack the best)
3.3.2019

glutenfreesugarcookies

Filed Under: Desserts & Baked Goods · Tagged: allergen free, cookie, dairy free, dessert, easy, enjoy life, gluten free, healthy, party, snack, sugar cookies, treat, yeast free

Gluten Free Orange Carrot Ginger Muffins

August 18, 2020 · by Meg · 1 Comment

Gluten Free Orange Carrot Ginger Muffins

IMG_3374

My husband’s favorite cake is carrot (okay, maybe second to chocolate). I had him test these out with the new Enjoy Life Muffin Mix that I used to create these Gluten Free Orange Carrot Ginger Muffins. All I have to say about his reaction is Winner, Winner, Chicken Dinner!! His eyes lit up when he took a bite of these!

They are super easy to put together, and they are just to die for! They are really great for a quick breakfast, but also for an awesome morning or afternoon snack. My daughter (who just turned 1), also devoured these, so kid friendly, especially because all those carrots are hidden!! The ginger makes is a little zesty, the orange makes it a little sweet - the perfect balance! Well, what are you waiting for, get to your kitchen to make these muffins!!

Print
Gluten Free Orange Carrot Ginger Muffins
Author: Meg Staples
Recipe type: Muffin
Prep time:  15 mins
Cook time:  15 mins
Total time:  30 mins
Serves: 9 muffins
 
Ingredients
  • 1½ cups Enjoy Life Muffin Mix (as prepared, I made mine with coconut oil)
  • ½ cup finely shredded carrots (you can use a cheese grater or a food processor)
  • 1 orange, zested
  • ¼ cup fresh squeezed orange juice
  • 2 teaspoons grated ginger (or dried ginger)
  • ½ teaspoon cinnamon
  • *extra coconut oil for greasing muffin tin or muffin liners
Instructions
  1. Preheat the oven to 350 degrees
  2. Prepare the muffin mix (as directed)
  3. Shred carrots with a cheese grater or food processor
  4. Place shredded carrots in a bowl and squeeze & zest the orange, adding it to the bowl of carrots
  5. Grate ginger & add to the carrots
  6. Add cinnamon
  7. Add the muffin mix to the carrot mixture, mixing until well combined
  8. Divide the mixture evenly among 9 muffin tins
  9. Bake for 15 minutes or until a toothpick or knife comes clean
  10. Allow to cool before devouring!
3.3.2019


glutenfreeorangecarrotgingermuffins

Filed Under: Breakfast, Desserts & Baked Goods · Tagged: allergen free, appetizer, breakfast, carrot, cinnamon, dairy free, dessert, easy, enjoy life, ginger, gluten free, healthy, muffin, orange, snack, treat, vegetarian, weight loss

Chocolate Coconut Tartlets

August 16, 2020 · by Meg · Leave a Comment

Chocolate Coconut Tartlets

IMG_3392
T
here are not many things I love much more than the chocolate & coconut pairing! I was recently gifted the new Enjoy Life Baking Mixes!! They are SO easy to use - add water & oil (I like coconut oil best) & they taste SO good! Also a plus: they are incredibly versatile)! Multi purpose mix, muffin, pancake, waffle, brownie & pizza mixes?!! They did not disappoint! Even my husband loves everything I’ve made! (Note: All enjoy life products are free of the top 8 allergens: wheat/gluten, dairy, peanuts, tree nuts, egg, soy, fish and shellfish free!. Products are also made without casein, potato, sesame and sulfites.

I’m sharing with you today one of the new recipes I tested out with the multi purpose flour, these wonderful chocolate coconut tartlets!! I added it as the thickening agent for the creamy chocolate center in these beautiful little gems. I also used melted Enjoy Life Chocolate Chips for the filling! They are a must make for any chocolate coconut fan you have in your life. Perfect for dessert or a summer party, you can’t go wrong! I hope you enjoy them as much as we do!

Print
Chocolate Coconut Tartlets
Author: Meg Staples
Recipe type: Dessert
Prep time:  10 mins
Cook time:  40 mins
Total time:  50 mins
Serves: 12 tartlets
 
Ingredients
for the crust
  • 1½ cups unsweetened coconut shreds
  • ¼ cup coconut sugar
  • 2 egg whites
for the filling
  • ¾ cup almond milk
  • 4 ounces enjoy life chocolate chips
  • 6 tablespoons Enjoy Life Gluten Free All Purpose Flour Mix
  • 1 egg
  • ½ teaspoon vanilla extract
  • *coconut oil for greasing
  • *slivered almonds for topping, optional
Instructions
  1. Preheat the oven to 350 degrees
  2. Mix crust ingredients until they form a ball of ‘dough’
  3. Divide into 12 equal balls of dough
  4. In a lightly greased mini muffin pan, place balls of dough in each muffin tin, pressing your thumb into the dough to make a hole for the filling
  5. Place in the oven to bake for 10 minutes until the edges are brown
  6. While the coconut shells are baking, measure out chocolate chips and place them in the microwave for 30 seconds. They should be slightly melty. Mix together with a fork or whisk until completely melted, (*add more time in the microwave if needed, 10 seconds at a time)
  7. Add all other ingredients to the chocolate and whisk until well combined.
  8. Allow coconut shells to cool once they are finished.
  9. Once cooled (10 minutes or so) add filling (and sprinkle with slivered almonds, optional) and bake for another 10 minutes, or until a toothpick or knife comes out clean.
  10. Allow to cool before eating
3.3.2019

glutenfreechocolatecoconuttartlets

Filed Under: Desserts & Baked Goods · Tagged: allergen free, almonds, chocolate, coconut, dairy free, dessert, egg free, enjoy life, gluten free, healthy, party, snack, soy free, tart, tartlet, vegetarian, wheat free

Peanut Butter Cranberry Protein Bites

July 27, 2020 · by Meg · 1 Comment

Peanut Butter Cranberry Protein Bites

IMG_3321

With all of my running lately (in case I forgot to mention it, I’m training for my first marathon in October. Sometimes I wonder what I’m really thinking!), I’m needing easy, go to snacks for post run munching. These peanut butter cranberry protein are easy to carry with me, they travel well and they taste good. Plus, they really fill me up! All that protein from the protein powder, the peanut butter, dates and nuts. I left out the chocolate on these because if I’m out and about I dont’ want to worry about something melting in my purse or bag (and they are way less messy this way, too). The cranberries give them a beautiful hint of sweetness. Nutritious and delicious!

I could probably eat these all day. When I went to go shoot the photos for this post - look who jumped in?! Zoey just took her first steps this week, if we thought we were in trouble before, I think we were just fooling ourselves… What does this girl not find that is dangerous?
IMG_3306

You can swap out any protein powder for the one I used (I like this plant based powder, it’s plain, so I can add it to anything). I also love this peanut butter powder, there is nothing added to it, although I know a lot of people love this one (which would work just fine)! I know you will just love these for an anytime snack, just like Zoey & I do!!

meg

5.0 from 1 reviews
Print
Peanut Butter Cranberry Protein Bites
Author: Meg Staples
Recipe type: Snack
Prep time:  5 mins
Total time:  5 mins
Serves: 15 snack bites
 
Ingredients
  • 1 cup dates, pitted
  • ½ cup raw almonds
  • ¼ cup raw sunflower seeds
  • ¼ raw pumpkin seeds (pepitas)
  • ¼ cup (reduced sugar) dried cranberries
  • 1 scoop protein powder
  • 3 tablespoons jif powdered peanut butter
  • 1 tablespoon cinnamon
  • 1 tablespoon vanilla extract
  • water (if needed)
Instructions
  1. Buzz almonds (or nut of choice) and seeds in food processor or blender until fine
  2. Add remaining ingredients and buzz until the ‘dough’ begins to form a ball
  3. If the ‘dough’ is not solidifying, add 1 tablespoon of water (or non dairy milk) at a time until the dough does become a ball
  4. Remove dough from food processor or blender and divide into 15 equal balls (rolling each of the 15 sections into a ball, or 31 grams for each ball for each serving)
  5. Chill in the refrigerator & enjoy
3.3.2019

veganglutenfreepeanutbuttercranberryproteinbites

Filed Under: Appetizers & Sides, Breakfast · Tagged: allergen free, almond butter, cranberry, dairy free, easy, gluten free, grain free, healthy, no bake, no mess, peanut butter, protein, snack, vegan

Primal Low Carb Kitchen Review

July 22, 2020 · by Meg · Leave a Comment

Primal Low Carb Kitchen Review

unnamed-4-667x750


My friend Kyndra over at Peace, Love & Low Carb recently published a book called The Primal Low Carb Kitchen! It’s a great book with tons of awesome recipes and Kyndra has been kind enough to let me share my favorite snack from the book, Coffee Cocoa Roasted Nuts. You pay so much for flavored nuts at the grocery store (and most of the time, not full of healthy ingredients). These are just the best - they’ve been my go to snack just about every day the past few weeks! And the book appeals even to the pickiest of eaters (just ask my husband, he’s loved every recipe I’ve tried from this book)! And the Lemon Chia Pancakes are just to die for! The BEST!! Please go pick up your copy of Kyndra’s book Peave, Love & Low Carb this minute!!

Print
Primal Low Carb Kitchen Review
Author: Kyndra Holley
Recipe type: Snack
Prep time:  5 mins
Cook time:  20 mins
Total time:  25 mins
 
Ingredients
  • 1 cup (95g) raw almonds
  • 1 cup (130g) raw cashews
  • 1 cup (110g) raw pecans
  • 3 tbsp (45g) butter, melted (I subbed out coconut oil)
  • 2 tsp (9g) vanilla extract
  • 11/2 tsp (7g) coffee extract
  • 3 tbsp (30g) coconut sugar
  • 3 tbsp (20g) unsweetened cocoa powder
Instructions
  1. Preheat the oven to 350 degrees. Line a rimmed baking sheet with parchment paper
  2. In a large mixing bowl, combine almonds, cashews and pecans
  3. In a separate bowl, combine butter (coconut oil) vanilla and coffee extract. Mix in the coconut sugar and cocoa powder. Mix until all the ingredients are well combined and make a thick chocolate sauce.
  4. Pour the mixture over the nuts and mix until the nuts are evenly coated with the sauce.
  5. Line the nuts in a single layer across the parchment paper. Use a rubber spatula to scrape any additional sauce and drizzle it over the nuts.
  6. Bake 20 minutes. Allow to cool before serving.
Nutrition Information
Calories: 181 Fat: 16g Carbohydrates: 2g Fiber: 6g Protein: 8g
3.3.2019


IMG_7694


meg


Filed Under: Book Reviews · Tagged: almonds, book review, coffee, healthy, kyndra holley, love & low carb, peace, snack

Paleo Pineapple Coconut Bars

July 18, 2020 · by Meg · 12 Comments

Paleo Pineapple Coconut Bars

pinaepplebarscloseup

*picture above is right before it went into the oven!

When I think of summer foods, my mind goes to fruit! Specifically, pineapple! Who doesn’t love this awesome fruit? So versatile, too! In a salad, as a dessert, on the grill with something savory! You can’t go wrong! These (paleo/gluten free/grain free) pineapple coconut bars are a perfect summer treat. Really easy to make, and the flavor reminds me of a pina colada! Although I made these and had all of my family do the taste testing, these would be the most marvelous ending to a summer BBQ. What do you think?

meg

4.7 from 3 reviews
Print
Paleo Pineapple Coconut Bars
Author: Meg Staples
Recipe type: Dessert
Prep time:  15 mins
Cook time:  40 mins
Total time:  55 mins
Serves: 12 bars
 
Ingredients
for the crust
  • ¼ cup coconut oil, melted + more for greasing
  • 1 cup almond flour
  • ¼ cup coconut sugar or honey crystals
for the filling
  • 3 cups chopped pineapple (fresh or canned)
  • 1½ cups sweetened or unsweetened coconut flakes (depending on how sweet you like it)
  • ¼ cup coconut sugar
  • 2 eggs
  • 2 tbsp almond flour
  • 1 tbsp vanilla extract
  • ¼ tsp baking powder
Instructions
  1. Preheat oven to 350 degrees
  2. Add all crust ingredients to buzz in a food processor until it forms a ball of dough
  3. Press dough evenly into the bottom of the pan
  4. Bake at 350 for 10-15 minutes
  5. Remove from oven and set aside
  6. Whisk together coconut sugar, almond flour, and baking powder in a bowl
  7. Add eggs and vanilla and mix until well combined
  8. Stir in coconut flakes and pineapple
  9. Spread mixture evenly over crust (add more coconut flakes for extra topping if desired)
  10. Bake for 20-25 minutes, until edges are golden.
  11. Allow to cool completely, then cut into squares (12)
  12. Best if served chilled!
3.3.2019

paleopineapplecoconutbars3

Filed Under: Desserts & Baked Goods · Tagged: bars, bbq, coconut, dessert, easy, get together, gluten free, grain free, paleo, party, pineapple, plant based, simple, summer, vegetarian

Vegan S’mores Smoothie

July 14, 2020 · by Meg · 1 Comment

Vegan S’mores Smoothie

smoresmoothie

What is better than s’mores on a summer night? Not too much, right? I do really love a gooey s’more every once in a while, but most of the ingredients aren’t very good for you, unfortunately. A little splurge every once in a while isn’t so bad, but if there’s a way that I can make them healthier, I’m going to do it! (and that way I can have a few more). This smoothie was inspired by the s’more, the perfect summer treat! Just as decadent, though. I used So Delicious Coco Whip as the ‘marshmellow’ (really awesome cool whip that is vegan that So Delicious just came out with). I highly recommend it if you haven’t already tried it! But I really love either The Urban Poser’s or 100 Days of Real Food’s marshmallow recipe if you want to use the real deal (and both really easy to make). I promise you will really love this recipe!

What is your favorite summer treat?

Print
Vegan S’mores Smoothie
Author: Meg Staples
Recipe type: Smoothie
Prep time:  5 mins
Total time:  5 mins
Serves: 2 smoothies
 
Ingredients
  • 1 cup So Delicious Coco Whip or 4 homemade marshmellows
  • 1 cup non dairy milk
  • 4 gluten free graham crackers (homemade or store bought)
  • 1 tablespoon raw cocao powder
  • Enjoy Life Chocolate Chips (to sprinkle on top if desired) feel free to add some in the smoothie if you want!
  • ice to taste
Instructions
  1. Place all ingredients in a blender & serve immediately
3.3.2019

glutenfreevegansmoresmoothie

Filed Under: Desserts & Baked Goods, Smoothies & Drinks · Tagged: decadent, dessert, egg free, gluten free, grain free, s'mores, smoothie, summer, vegan, yeast free

Perfect Summer Salad

July 3, 2020 · by Meg · Leave a Comment

Perfect Summer Salad

IMG_3094

Summer is officially here! (well, it has been for a while). What is your favorite summer activity? It’s never officially ‘summer’ for me until we’ve headed to the cape at the end of June, and we stay the entire month of July. It’s been cool, but we’re having a great time so far!

Also FYI for anyone living around Marylou’s, they now carry stevia and almond milk!! Yahoo! Anyways….

This is the perfect summer salad - and my go to when I’m hosting dinner, or I need to bring something over to a party! Easy, simple, and a very light dressing to accompany it. You can make it this way, or make it your perfect summer salad by adding (or subtracting) whatever ingredients you like. Mine incorporates red onion, tomatoes, cucumber, peppers, avocado and carrots. Sometimes it’s nice to have a lettuce free salad! What is your favorite salad ingredient?

Print
Perfect Summer Salad
Author: Meg Staples
Recipe type: salad
Prep time:  10 mins
Total time:  10 mins
Serves: 4
 
Ingredients
  • 1 avocado, sliced and cubed
  • 2 large tomatoes, washed and cubed
  • 1 cucumber, washed and cubed
  • ½ cup shredded carrots
  • 1 peppers, washed and cubed
  • ½ cup red onion, washed and chopped
for the dressing
  • 2 lemons, juiced
  • 2 tablespoons organic italian seasoning
Instructions
  1. Wash and chop all vegetables as needed or desired
  2. Place all ingredients in a bowl and toss with lemon juice and italian seasoning
  3. Serve immediately
3.3.2019

perfect summer salad

Filed Under: Appetizers & Sides, Entrees · Tagged: appetizer, avocado, carrots, cucumber, dinner, easy, egg free, entree, gluten free, grain free, healthy, lemon juice, paleo, pepper, salad, summer party, tomato, vegan, vegetarian, yeast free

Nut Free Strawberry Lemon Blender Muffins

June 27, 2020 · by Meg · Leave a Comment

Nut Free Strawberry Lemon Blender Muffins

IMG_3222

The other day my Mom & I went strawberry picking and we ended up with about 20 pounds of strawberries! It is definitely one of my favorite fruits… although, I never met a fruit I really didn’t like! I knew I had to act fast with my strawberries (I washed the rest and put them in the freezer), so my first thought was muffins. I kind of love muffins.

Jake does not like what he calls ‘chunks’, so I knew in order for him to taste test and enjoy them, they had to be ‘chunk’ free, hence the use of the blender. I didn’t mind though, it makes them easy. I also really love the combination of strawberry and lemon, (try my strawberry lemonade popsicles) so I thought I’d give that a whirl in putting these together. So, here they are, my nut free, strawberry lemon blender muffins. They are also paleo and gluten free, of course (not vegan, sorry). I love my eggs! What is your favorite flavor of muffin?

Print
Nut Free Strawberry Lemon Blender Muffins
Author: Meg Staples
Recipe type: muffin
Prep time:  5 mins
Cook time:  20 mins
Total time:  25 mins
Serves: 6 muffins
 
Ingredients
  • 3 eggs
  • zest of one lemon
  • juice of one lemon
  • 1 cup strawberries, fresh or frozen
  • ¼ cup coconut flour
  • ¼ cup non dairy milk
  • 2 tablespoons coconut oil, melted + more for greasing
  • 1 tablespoon stevia or coconut sugar (optional, for sweetness)
  • ¼ teaspoon baking powder
Instructions
  1. Preheat the oven to 400 degrees
  2. Wash strawberries if needed
  3. Put all ingredients in a blender or food processor and buzz until smooth
  4. Line muffin tin with liners or grease with coconut oil
  5. Disperse batter evenly among 6 muffin cups
  6. note: place ½ strawberry on each muffin for garnish if desired
  7. Bake for 18-22 minutes or until a toothpick comes out clean
  8. *fill empty cups half way with water for more even baking
  9. Allow to cool & enjoy
3.3.2019

nutfreestrawberrylemonmuffins

Filed Under: Breakfast, Desserts & Baked Goods · Tagged: allergen free, breakfast, coconut flour, dairy free, easy, gluten free, grain free, healthy, lemon, muffin, nut free, paleo, snack, strawberry, vegetarian, yeast free

Paleo Takeout Review

June 23, 2020 · by Meg · Leave a Comment

Paleo Takeout Review

ptocover

Book review season is here! Be on the lookout for 2 more this week by some of my very talented friends, with whom I’ve had the privilege to do book reviews for!

First up is Russ over at The Domestic Man. His story is pretty incredible, and he’s used food to heal his mind and body. Who doesn’t love a story like that? And now he’s an amazing chef, with not one but two books out, and this one is going to blow your mind. Really. And if you head over to follow both me and Russ on Instagram, I’m giving away a copy until Wednesday, June 24th!

We’ve been lucky enough to try multiple recipes in the book, the hot and sour soup (amazing), the egg drop soup (recipe shared below), and my personal favorite, the blackened fish tacos. This is a book worth having, you will make these recipes again & again & again. We have at least 2 more planned for this week, including the Chipotle Burrito Bowls!


Print
Paleo Takeout Review
Author: Russ Crandall
Recipe type: Soup
Cuisine: Chinese
Prep time:  2 mins
Cook time:  5 mins
Total time:  7 mins
Serves: 4 servings
 
Ingredients
  • slurry:
  • 3 tbsp arrowroot starch
  • 2 tbsp cold water
  • soup:
  • 3 cups vegetable or chicken broth
  • 1 cup water
  • ¼ tsp sea salt
  • ¼ tsp white pepper
  • ¼ tsp ground ginger
  • 2 large eggs plus one large egg yolk, beaten
  • 1 green onion, chopped for garnish, optional
Instructions
  1. Stir together the arrowroot starch and cold water to create a slurry, then set aside
  2. In a stock pot, combine the broth, water, salt, pepper and ginger and bring to a boil over high heat. Once soup is boiling, stir in half of the arrowroot starch slurry. Continue to stir until thickened, about 1 minute, adding the rest of the slurry if needed. Taste the soup and add more seasonings if needed.
  3. Reduce the heat to low and slowly pour the eggs through a fork in the soup. Once the eggs have been added, whisk gently with a fork to prevent clumping, then allow to cook through, 1 more minute.
  4. Serve immediately, garnish with green onion if desired
3.3.2019


Filed Under: Book Reviews, Health & Wellness · Tagged: book review, giveaway, paleo, paleo take out, russ crandall

  • « Previous Page
  • 1
  • 2
  • 3
  • 4
  • …
  • 20
  • Next Page »

Subscribe via Email

Connect with Veggie Staples

  • Email
  • Facebook
  • Instagram
  • Pinterest
  • RSS
  • Twitter

Meet Meg

Hi! My name is Meg, owner and blog writer for Veggie Staples! Thanks for stopping by! I love creating healthy, yummy recipes for everyone to enjoy (meat and non-meat eaters alike)! For more information check out my About Me page. Read More…

Search Recipes

FitFluential Is Fitness Found
myTaste.com

Copyright © 2019 | Innovative by The Pixelista | Built on the Genesis Framework