Veggie Staples

dairy free, gluten free, refined sugar free, plant based recipes

  • Home
  • About
  • Recipe Index
    • Appetizers & Sides
    • Breakfast
    • Desserts & Baked Goods
    • Entrees
    • Smoothies & Drinks
  • Health & Wellness
    • Health & Wellness
    • Book Reviews
    • Weight Loss
    • Workouts

Nut Free Strawberry Lemon Blender Muffins

June 27, 2020 · by Meg · Leave a Comment

Nut Free Strawberry Lemon Blender Muffins

IMG_3222

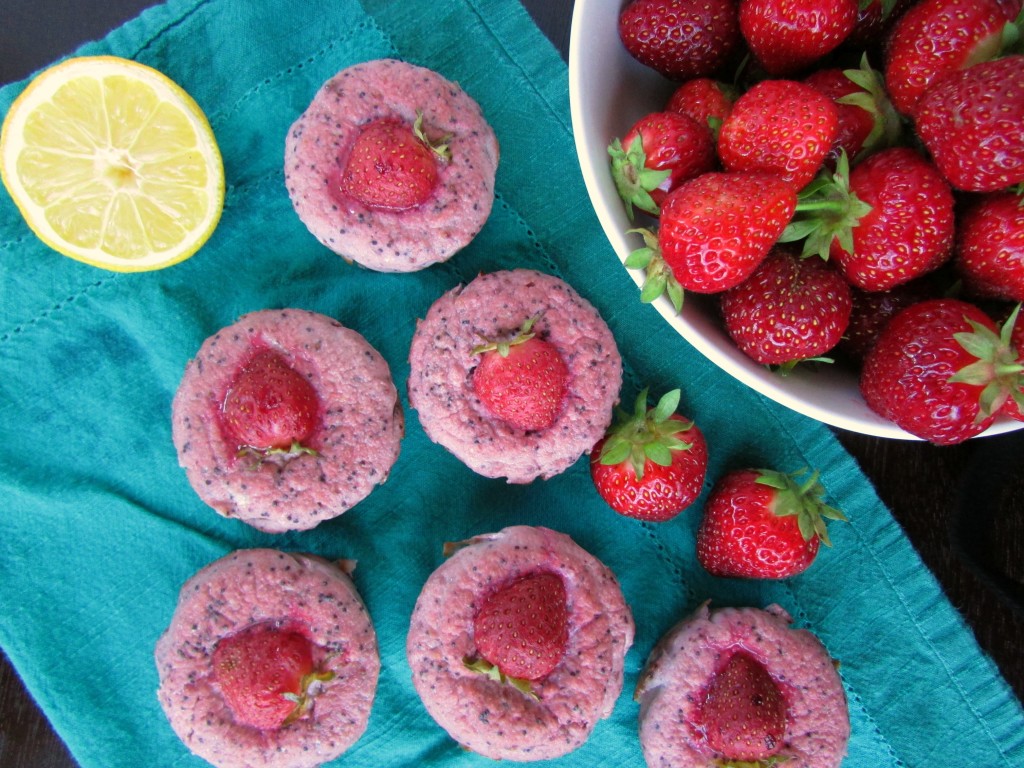
The other day my Mom & I went strawberry picking and we ended up with about 20 pounds of strawberries! It is definitely one of my favorite fruits… although, I never met a fruit I really didn’t like! I knew I had to act fast with my strawberries (I washed the rest and put them in the freezer), so my first thought was muffins. I kind of love muffins.

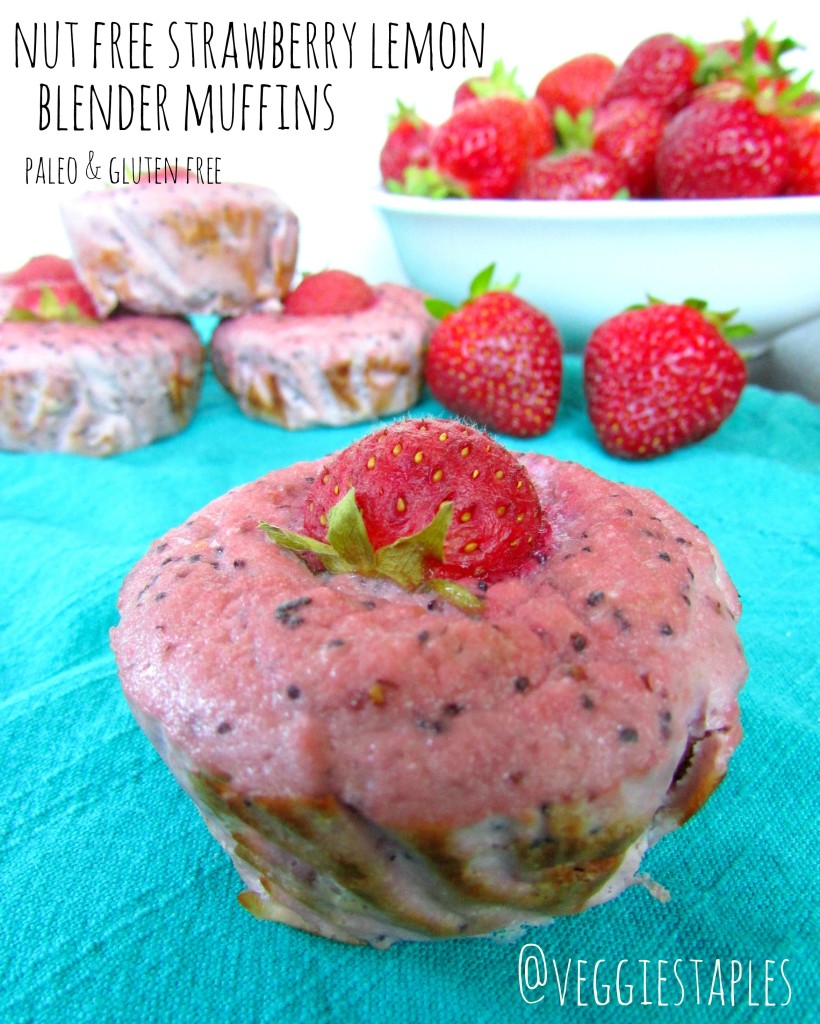
Jake does not like what he calls ‘chunks’, so I knew in order for him to taste test and enjoy them, they had to be ‘chunk’ free, hence the use of the blender. I didn’t mind though, it makes them easy. I also really love the combination of strawberry and lemon, (try my strawberry lemonade popsicles) so I thought I’d give that a whirl in putting these together. So, here they are, my nut free, strawberry lemon blender muffins. They are also paleo and gluten free, of course (not vegan, sorry). I love my eggs! What is your favorite flavor of muffin?

Print
Nut Free Strawberry Lemon Blender Muffins
Author: Meg Staples
Recipe type: muffin
Prep time:  5 mins
Cook time:  20 mins
Total time:  25 mins
Serves: 6 muffins
 
Ingredients
  • 3 eggs
  • zest of one lemon
  • juice of one lemon
  • 1 cup strawberries, fresh or frozen
  • ¼ cup coconut flour
  • ¼ cup non dairy milk
  • 2 tablespoons coconut oil, melted + more for greasing
  • 1 tablespoon stevia or coconut sugar (optional, for sweetness)
  • ¼ teaspoon baking powder
Instructions
  1. Preheat the oven to 400 degrees
  2. Wash strawberries if needed
  3. Put all ingredients in a blender or food processor and buzz until smooth
  4. Line muffin tin with liners or grease with coconut oil
  5. Disperse batter evenly among 6 muffin cups
  6. note: place ½ strawberry on each muffin for garnish if desired
  7. Bake for 18-22 minutes or until a toothpick comes out clean
  8. *fill empty cups half way with water for more even baking
  9. Allow to cool & enjoy
3.3.2019

nutfreestrawberrylemonmuffins

Filed Under: Breakfast, Desserts & Baked Goods · Tagged: allergen free, breakfast, coconut flour, dairy free, easy, gluten free, grain free, healthy, lemon, muffin, nut free, paleo, snack, strawberry, vegetarian, yeast free

Paleo & Nut Free Lemon Blueberry Muffins

June 10, 2020 · by Meg · 7 Comments

Paleo & Nut Free Lemon Blueberry Muffins

IMG_3192

It’s summer & it’s berry season! I’ve been super duper craving muffins lately, and I still have an obscene amount of blueberries in the freezer from last summer, and knowing that we’re going to go again soon, I want to use them up. So lemon blueberry muffins it is (and they are nut free)! That means lots of blueberry smoothies, etc! Although I love blueberries (and lemons), my favorite berry is the blackberry (I have a great recipe for a blackberry smoothie here and a great recipe for blackberry watermelon popsicles here). What is your favorite berry?

1.0 from 1 reviews
Print
Paleo & Nut Free Lemon Blueberry Muffins
Prep time:  10 mins
Cook time:  20 mins
Total time:  30 mins
Serves: 5 muffins
 
Ingredients
  • 3 eggs
  • zest of one lemon
  • juice of one lemon
  • ¾ cup blueberries, fresh or frozen
  • ¼ cup coconut flour
  • 2 tablespoons coconut oil, melted + more for greasing
  • 1 tablespoon stevia or coconut sugar (optional, for sweetness)
  • 1 tablespoon non dairy milk
  • ¼ teaspoon baking powder
  • ¼ teaspoon vanilla extract
Instructions
  1. Preheat oven to 400 degrees
  2. Wash blueberries if needed
  3. Combine dry ingredients, sift thoroughly
  4. Combine wet ingredients (except blueberries) and mix well
  5. Combine wet and dry ingredients and mix well
  6. Gently fold in blueberries
  7. Line 5 muffin cups or grease with extra coconut oil
  8. bakers note: if you add water to empty muffin cups (1/2 full) muffins will bake more evenly
  9. Bake 18-22 minutes or until a toothpick comes out clean
  10. Allow to cool before eating
3.3.2019

paleolemonblueberrymuffins

Filed Under: Breakfast, Desserts & Baked Goods · Tagged: blueberry, easy, easy breakfast, gluten free, grain free, high protein, lemon, low carb, muffin, nut free, paleo, yeast free

Springtime Vegetable Pot Pie

May 12, 2020 · by Meg · Leave a Comment

Springtime Vegetable Pot Pie

IMG_3069

This isn’t 21 DSD friendly (something I am doing right now, more recipe for that soon) but I made 4 of these Spring Vegetable Pot Pie’s before I went on the detox and stuck them in the freezer (not after having one for my lunch the next few days, of course). I know they will be great go to’s for dinner at the end of the school year with all of the hustle and bustle going on. I opted to make 2 mini pot pies, but you could make one big one if you were feeding a family (double the recipe for 2 or 4, to store in the freezer for later). It’s easy because you throw all the veggies you’d like into a pan with some flour & stock & voila! You have your filling! The crust is a simple recipe I use from The Coconut Mama (no need to reinvent the wheel!). These spring vegetable pot pies are really easy to make and roll out for the top and the bottom of the pies. You can switch up your own veggies, add chicken if you have meat eaters on your hands, etc. Either way it’s a really easy dinner & even more easy to make extra back ups for freezing! Enjoy!

Print
Springtime Vegetable Pot Pie
Author: Meg Staples
Recipe type: Vegetable Pot Pie
Prep time:  20 mins
Cook time:  20 mins
Total time:  40 mins
Serves: 1 pot pie
 
Ingredients
  • 1 small onion, peeled & chopped roughly chopped
  • 2 large carrots, peeled, washed & chopped
  • 1 cup string beans, washed and chopped
  • 2 cups corn from corn on the cob
  • ¼ cup coconut flour
  • 1½ cups vegetable stock
  • ½ cup non-dairy milk
  • ⅔ cup frozen sweet peas
  • 1 tablespoon thyme
  • 1 tablespoon oregano
  • 1 tablespoon rosemary
  • 1 tablespoon coconut oil for cooking veggies
  • salt & pepper to taste
Instructions
  1. Wash & chop all veggies
  2. Prepare pie crust *see recipe for The Coconut Mama’s Coconut Flour Pie Crust above*
  3. In a large pan, heat the coconut oil on medium heat until melted
  4. Add all of the veggies & cook until barely tender
  5. Stir in milk, vegetable stock, coconut flour & spices
  6. Mix until flour is dissolved
  7. Reduce heat & allow to cook for another 5-7 minutes
  8. Change oven temperature from 400 to 375 degrees
  9. Pour filling into the bottom of the pie crust (or 2 small pie pans if desired)
  10. Roll out the remaining pie crust to cover the top
  11. Poke four small slits in the top to allow steam to come out
  12. Spread extra melted coconut oil (1 tablespoons) for a more golden crust
  13. Bake for 17-20 minutes or until edges brown
  14. Enjoy!
3.2.2019

glutenfreepaleovegetablepotpie

Filed Under: Entrees · Tagged: allergen free, coconut flour, dairy free, easy, easy dinner, gluten free, grain free, healthy, nightshade free, nut free, paleo, pot pie, vegetables, vegetarian, veggies, weight loss, yeast free

No Marshmallow Rice Crispy Treats

April 22, 2020 · by Meg · Leave a Comment

No Marshmallow Rice Crispy Treats

IMG_3005

My husband loves rice crispy treats. As in, I make them, and they are gone within the day. It’s a pretty crazy addiction (along with all his other sweet treats). But, unfortunately, marshmallows are not very good for you, and making them on your own is not easy! So, I thought, what could I use that I know would be a good marshmallow substitute? Honey, for sure (I didn’t try my two batches with maple syrup, so I’m not sure that it would work). These were just as awesome with no marshmallows! Husband approved, and I added chocolate chips to the second batch for hint of extra sweetness! Yum! These no marshmallow rice crispy treats are a great alternative so the normal ones - full of processed ingredients! I also used Enjoy Life’s Crunchy Flax Cereal for the ‘rice crispies’. I am a huge advocate for their foods, free of the top 8 allergens (especially gluten & dairy free! I always use their chocolate chips)! You could also swap out half of the honey for some sort of nut butter to help the cereal stick together. What is your favorite indulgence?

IMG_3000

Enjoy-Life-Perkys-Crunchy-Flax-Cereal-Gluten-Free-853522000917

Print
No Marshmallow Rice Crispy Treats
Author: Meg Staples
Recipe type: Snack
Prep time:  5 mins
Total time:  5 mins
Serves: 12 bars
 
Ingredients
  • 1 box enjoy life crunchy flax cereal
  • ½ cup honey (or ¼ cup honey, ¼ cup nut butter)
  • ½ cup Enjoy Life Chocolate Chips
  • 3 tablespoons coconut oil
  • 1 teaspoon vanilla extract
Instructions
  1. Pour cereal in a large mixing bowl
  2. Melt honey, coconut oil & vanilla on a pan on low
  3. Pour honey mixture over cereal until evenly distributed
  4. Add in ½ cup chocolate chips and mix well
  5. Place rice cereal mixture in a 9 X 9 inch pan, pressing down until flat and even
  6. Place pan in the refrigerator for at least one hour
  7. Cut into 12 squares and serve
  8. Best if left refrigerated
3.2.2019


veganglutenfreericecrispytreats

Filed Under: Desserts & Baked Goods · Tagged: allergen free, chocolate, dairy free, dessert, egg free, gluten free, healthy, marshmallow, nut free, rice crispy treat, snack, treat, vegan, yeast free

Subscribe via Email

Connect with Veggie Staples

  • Email
  • Facebook
  • Instagram
  • Pinterest
  • RSS
  • Twitter

Meet Meg

Hi! My name is Meg, owner and blog writer for Veggie Staples! Thanks for stopping by! I love creating healthy, yummy recipes for everyone to enjoy (meat and non-meat eaters alike)! For more information check out my About Me page. Read More…

Search Recipes

FitFluential Is Fitness Found
myTaste.com

Copyright © 2019 | Innovative by The Pixelista | Built on the Genesis Framework